When I received the invitation to a summer wedding I was intrigued by the special nature and the beauty of the invitation(s).
One was to a wedding in India , and the another to the subsequent American wedding. I decided to make a couple of glass trays out of the images for the newlyweds to celebrate these events.
I was also interested in my own journey of using an enameling technique I had learned on a fused glass tray.
If you do not have a scanner a cell phone image might work out. Also you can use your phone software to edit simple things. For this project I was more comfortable with using Photoshop. Use what you are familiar with.


After converting the file from color to a black and white image,
(in Photoshop) I was left with a very grey and dark image . 
Using the exposure adjustment tool in Photoshop I was able to improve the image.
Next is the beauty of layers. I always make a layer from the background before I do any work on an image in photoshop. This preserves my original image which I can do further things to as I progress, or recover the original image.
For this project I made 2 layers from the background and worked on them independently. I worked on the main image (layer 1) but in doing this I wiped out the figures. So on a different layer (layer2) I cut out the images from the background. I would use this to make a separate decal. I would apply this over the main image to recreate the original effect. The nice thing with layers is that it preserves the image size so you can print different layers on your printer and they are still the same size.
Layer 1 decal

I next used the magnetic lasso tool to separate the figures from the background This allowed me to edited them separately.

( Layer 2) I cut out the decal and placed on top of the first decal to recreate the full image. When fired it looks like one image.
You want a maximum contrast image for this to work best.
These work great on enamels as well as glass. Be sure to get the clear decals.
The company I used is no longer selling these.
Bullseye and Hollander glass sell the decals. I am sure other glass fusing stores also sell them.
My friend, Jan Harrell gave me this link . I have not used this product but it looks promising as a source. I would buy a small amount and see if they work. I would love some feedback if you try them.

www.npr.org/templates/
I have a p1102w HP laser printer that I use for these making these decals.
It uses a 85a Cartridge which works perfect for printing these decals. It has a great deal of iron in the cartridge ink, which fuses to the glass when heated, and creates the final image. Do not let the printer get to hot as it will ruin and melt the decal. I bought a refurbished unit, and it has worked well for the last 5 years.
Only use HP Branded cartridges. The iron content of the ink , is different in other brands, and they may not work for this technique. I found the following explanation and simple magnet test for the cartridge on a following blog:
In general you need a laser printer for your use, but most non- HP printer do not use iron oxide in the blend. Even HP is now using charged polymers in their toner blend and new printer may not have the iron content in the cartridge. So a good test would be to use a magnet and see if it sticks to the belly of the cartridge where the toner is located.
I would buy original OEM cartridge because if it is rebuilt, the density will not be as dark printing, because the roller which delivers toner will be worn. Most suppliers who rebuilt cartridges do not replace worn rollers to deliver toner as well as a new OEM cartridge. There are printers in the HP 1200 class that has more iron oxide due to how it must work.

You must remove the tissue paper from the decal paper, before you put the glossy side up ,into the printer paper tray. You want to start with a a very high contrast image. The longer you fire these decals the weaker and more faded they become. You can burn out the entire image if you use to much heat, especially if you are using them for enameling.
I fire them a 1350 for 1 to 2 minutes when I am enameling on copper. They hold up for maybe 2 firings.
Here is an example of how I use the decals I made with enamel podwer.

They were made from a silkscreen pattern. You can also use this technique for making glass decals with glass powder instead of enamel.
Next I cut and floated the decals on to work before the final firing
And the final result worked great. Do not overfire !!!!!

I learned this technique for enamel during my enameling studies at the Glassell School of Art. I would highly recommend a workshop, with Jan Harrell who is a master educator on this technique.
After laser printing the decals I cut the glass to fit my slumping mold. Leave a little extra glass around the edges to allow for cold working.
I soaked the decal in warm water for about 20 seconds or until it started moving. I then floated the decal onto the glass and gently removed the air bubbles from under the decal. I read in the bullseye monograph about pre fusing the glass to make it smooth. I did not do this. . Click here to go to thier webpage.
Next .. Let the decal dry completely overnight. If you fire it wet, you will get a mess!!! Be sure and remove any small air bubbles with a towel or squeegee and a lint free rag.

This is the look of decal after drying overnight. I was using french vanilla glass. Here are the other images:

You can see the image on the right is missing the figures in the bottom corner, which I added as second decal, and then let them all dry overnight.
The glass was paced on thin fire paper with a layer of 1/16 fiber under it as I had a couple of scratches in my kiln shelf that I did not want on them on the final fusing surface.


Because I was fusing 2 layers of glass in the kiln I added a bubble squeeze to my schedule and heated a bit slower . If I was using 1 layer for all the pieces in the kiln I would have heated faster at 400 per hour like the bullseye schedule.
300 per hour to 1225 with 1 1/2 hour hold
600 per hour to 1400 with a 10 min hold
9999 to 900 with 1 hr hold
then 150 per hr to 700 with no hold
then 9999 to room temp.
I was also interested if you could place a decal between 2 layers of glass without prefiring the decal. I did a a light shifting of powder over the decal after it dried, and put it (unfired) between 2 layers of clear glass. I used a very small amount of colored amber powder between the layers to see if this might work.

When the work came out I was very pleased. The large image looked great... the smaller images also worked. The decal experiment between the glass sheets also worked. There were several sharp spicules that needed to be removed with cold working.
.
before firing after firing
Here is the experiment of fusing the decal between glass sheets without pre firing. Minimal Bubbles due to bubble squeeze hold and slow heating to 1225. This worked, but I will hold off this recommendation until I try this further.
For backs to the work I chose to add a clear sheet of tekta covered with cobalt blue powder to make it look like a sky. For the smaller invites I added a deep blue purple divider (after I had cold-working the edges) and sifted a layer of 0421 Petal pink to give the writing some depth.

I am reusing the fiber paper from first firing. I will sandblast after firing to remove any residual fiber paper.

View of back after firing
With the addition of blue powder in between the glass and the prior fired decal blank I got a great sky motif that when sandblasted will be nice. I use 180 grit alum oxide in my sandblaster. To learn more look up my blog on sandblasting. By adding the pink background between the fused decal and its back I added depth to the printed image and the divider is a nice design element I will sandblast the ends on the decal side as well after the slump.

(Note to self...I need a new make a new kiln shelf than only will be used for full fusing that will stay smooth.)

300 per hour to 1200 hold to be 5 min or less (Visually I will confirm)
9999 to 900 degrees for a 1 hr hold
then 150 per hour to 700
then 9999 to 80.
1 square #8635 8.5x8.5x1.5
and 2 rectangular molds #8924 12.4x7.4x1.7


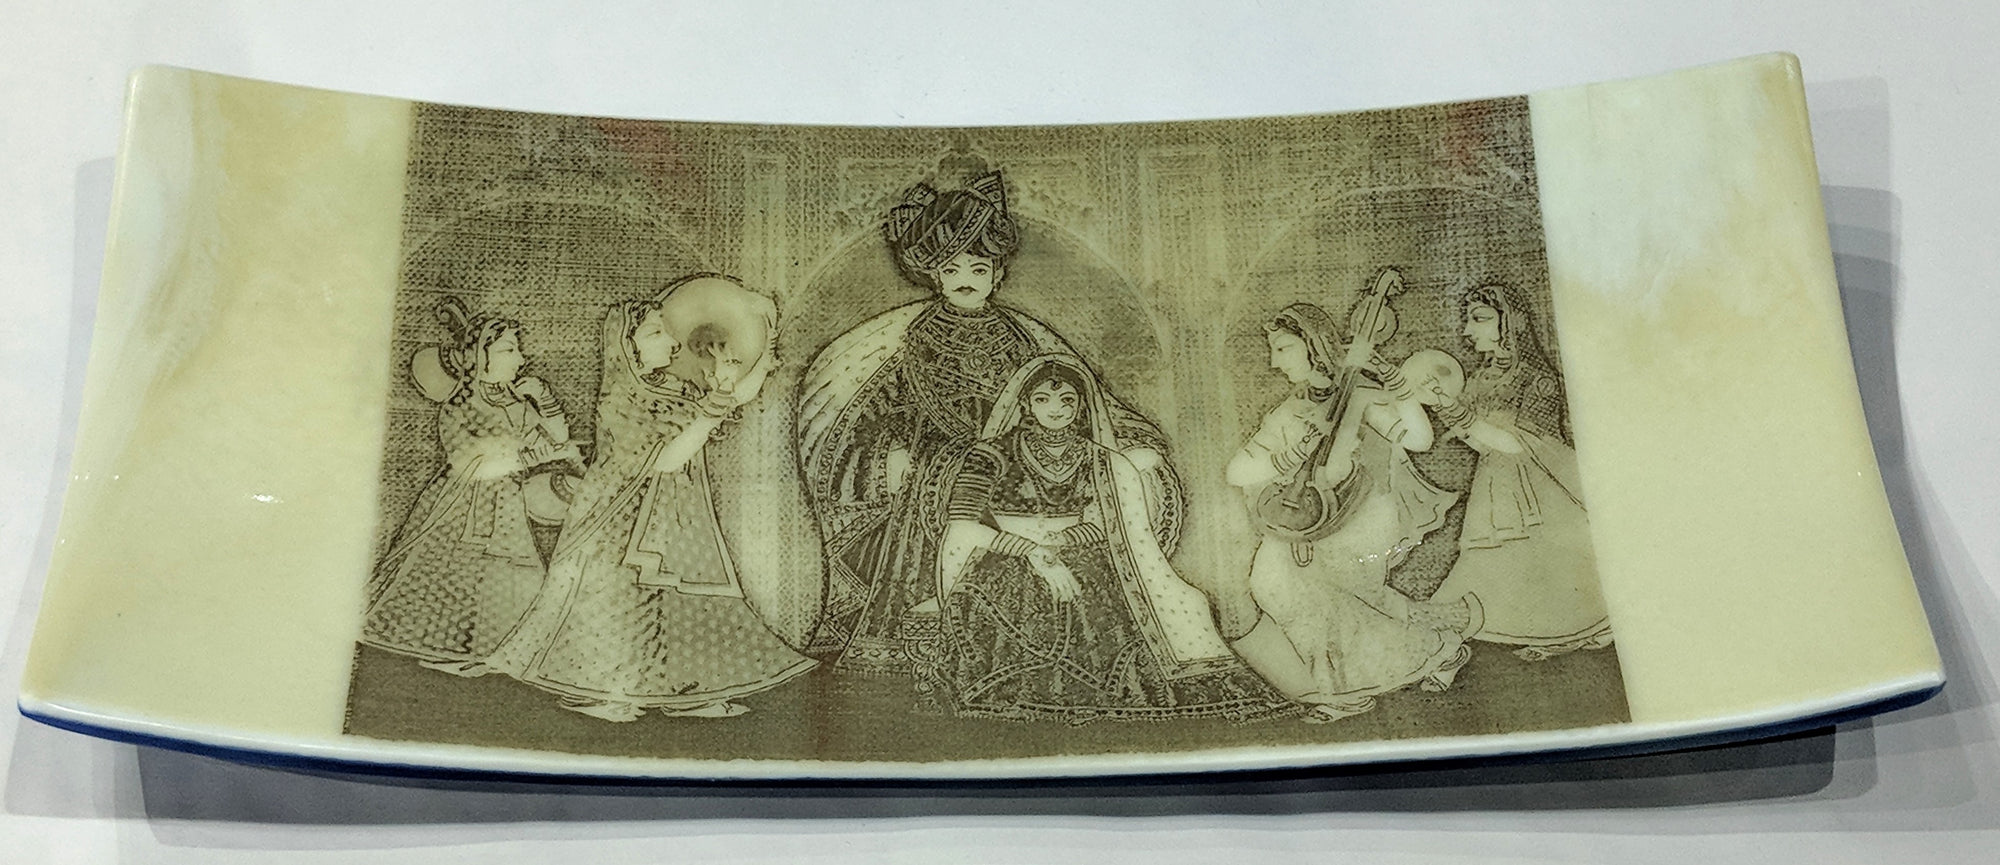
final images of decals on the finished work.


Laser Slide decals are a valuable technique for glass and Enamels. They provide a way of transferring complex images to your work.
I would love your feedback. Leave me a comment and I will get back to you. Thank you.

You were extremely helpful!! So, changing your pictures to Black and White creates a sharper image? I’ve had great luck just scanning color pictures but I didn’t know black-and-white ones would even do better? Thank you in advance!! Jean

Fabulous step by step guidance. Thank you for sharing your knowledge and wonderful work

Your step by step tutorial is excellent. I too like the laser-decal on fused glass technique, but the sepia look is not liked by everyone. It looks like the large image decal is closer to black after firing than the announcement text decals. Is that the photo or did you alter the technique to get a gray scale result after firing?

Love your new website, and found your log very interesting to read. Congratulations on graduation. :)

These are absolutely amazing!

Incredible. What a creative piece!!
Comments will be approved before showing up.

Dawn seeley
April 26, 2019
Loves ur e planation amd instructions even a beginner can follow along…thanks!